For honeybee brood trials high quality images facilitate the identification of brood stages. Especially eggs and small larvae are much easier to see in high quality images and also automatic recognition of brood stages will perform better. To help to achieve the best images with your gear, an overview is given in the following on how to obtain such photos.
Resolution
If an entire comb shall fill an image, a high resolution is required to clearly see eggs and larvae. Especially young larvae may be incredibly small and hard to see. In general, we recommend using resolutions of 24 MP or more. For smaller resolutions it becomes more and more difficult to visually see the cell content and also automatic recognition rates will drop.


Aperture
The aperture controls the amount of light reaching the camera sensor (if the aperture is closed by one “F-stop”, e.g. F8 instead of F5.6, half as much light reaches the sensor; smaller aperture corresponds to larger F-numbers). But more importantly, the depth of field is larger for smaller aperture. When using a large aperture (e.g. F5.6) the image will only be sharp at a very specific distance (e.g. only the bottom of cells will be sharp). The top of an old larva, which may be only a few millimeters closer to the camera, may already be out of focus. Closing the aperture will increase the depth of field. Using e.g. an aperture of F11 or F16 will result in images which are in focus both at the bottom of cells and the top of cells.
Light

Lighting is a key factor for brood photography. Ambient light is usually insufficient to illuminate the cell content (see image on the right); therefore artificial light is a must. Tungsten light (or LED light as an alternative), which is continuously providing light, has the advantage that the photographer can easily evaluate the light conditions. However, tungsten light is not very powerful; therefore it may be difficult to use smaller apertures than F8. Of course one could increase ISO to increase the sensitivity, but this usually results in grainy, noisy images. Furthermore, generators may be necessary to power tungsten light when used in the field. Flash light usually is much more powerful than tungsten light, facilitating the use of both a small aperture (e.g. F11 or F16) and a reasonably low ISO number (e.g. 100-400). In addition, when using flash and a small aperture, the influence of ambient light is minimized (because of the short exposure of 1/250 or 1/60 sec. combined with a small aperture). Therefore, when using flash light no special photo boxes are required to prevent ambient light reaching the comb (which may result in an unpredictable mix of ambient and artificial tungsten light). Finally, a flash is highly mobile.
How to illuminate the combs?

Illumination of combs for honeybee brood photography is not easy. One needs to get as much light as possible into the cells to view their content, but at the same time reflections (e.g. from nectar, royal jelly) should be minimized. In macro photography, this is typically achieved using soft light being directed at an approximately 45° angle to the subject. This can be done with either two light sources or one light source and a reflector (see image A and B). Usually softboxes are used, because direct light produces hard shadows and more reflections. A large number of softboxes are commercially available, which can be mounted onto flashes.


Focal length
Which focal length is required depends on the area needed for a brood assessment. If only the very center is required to track the development of e.g. 100 to 200 cells, then a lens with a small focal length of 100 mm will be sufficient. With such a lens, the distance to the comb will be approximately 1-1.5 m. The closer the camera is positioned to the comb, the more difficult it will be to have a good view into cells in the corners of the frame. For this reason, if one needs to evaluate an entire comb, larger distances of 2 m or more are required. To obtain images at this distance in which the comb still fills the frame focal lengths of 200 mm or more are necessary.

Some further refinements
Inclination of cells
Since cells are slightly inclined upwards by about 13°, it is easier to view into cells in the lower part of an image than in the upper part. Therefore, when a comb is vertically aligned for photography it may be impossible to identify brood stages in the upper 3rd of the combs (even more if a lens with a short focal length is used). To clearly identify the brood stages of all cells it helps to compensate for the inclination of the cells by slightly inclining the combs (see images below).


Camera shake
Camera shake can result in slighly blurry photos. This is less a problem when using flashlight, because then shutter speed is high. But even then camera shake may affect images, especially when using a high resolution camera. Motion blur can occur e,g, due to mirror shake, when the mirror of you DSLR lifts and hits the camera. This can be minimized using either a “Mirror-up” function, i.e. before actually taking the photo the mirror moves already upwards and when taking the photo the shutter is the only moving part. It also helps to use a sturdy tripod that firmly holds the camera and lens. Finally also pressing the shutter can cause camera shake. To minimize this use a cable release or the timer function.
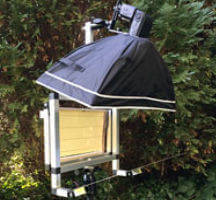
Our mobile setup
If you don’t have time to test different setups yourself you may want to consider to use our setup, which includes a highly mobile frame (with the possibility to incline combs), a softbox and reflector with a universal flash mount (compatible with any system flashes). Mounting on a tripod (not included) takes only about a minute and folded for transportation it occupies a minimum of space. If you have any question regarding this setup please contact us.


